Day 5
หน้ารายละเอียด + เพิ่ม แก้ไข ลบ
เวลา: 120 นาที จบคาบนี้จะได้: ระบบที่จัดการข้อมูลได้ครบวงจร — ดู เพิ่ม แก้ ลบ
⚠️ คาบนี้แน่นที่สุดของทั้งเทอม ถ้าพิมพ์ตามไม่ทัน ให้ทำเท่าที่ทำได้แล้วขอความช่วยเหลือจากอาจารย์หรือเพื่อนข้าง ๆ อย่าฝืนไล่ตามจนเสียเวลาช่วงอื่นไปด้วย
ช่วงที่ 1 — หน้ารายละเอียด (25 นาที)
🗺️ ตำแหน่งตอนนี้ในระบบ
- ✅ เตรียมเครื่องมือ (ทำไปแล้ว)
- 🟢 Angular (หน้าบ้าน) ← กำลังทำช่วงนี้
- ✅ NestJS (หลังบ้าน) (ทำไปแล้ว)
- ✅ PostgreSQL (ฐานข้อมูล) (ทำไปแล้ว)
ต่อไป: เพิ่ม endpoint ฝั่งหลังบ้านให้รองรับ เพิ่ม/แก้/ลบ
1.1 สร้าง component
cd C:\webdev\booklab\apps\web
npm exec -- ng generate component books/book-detail --skip-tests
1.2 เขียนโค้ด
แทนที่ book-detail.ts
import { Component, signal, inject, OnInit } from '@angular/core';
import { ActivatedRoute, RouterLink } from '@angular/router';
import { BookService } from '../book.service';
import { Book } from '../book';

@Component({
  selector: 'app-book-detail',
  imports: [RouterLink],
  templateUrl: './book-detail.html',
  styleUrl: './book-detail.css',
})
export class BookDetail implements OnInit {
  private route = inject(ActivatedRoute);
  private bookService = inject(BookService);

  book = signal<Book | null>(null);
  loading = signal(false);
  error = signal('');

  async ngOnInit() {
    const id = Number(this.route.snapshot.paramMap.get('id'));
    this.loading.set(true);
    try {
      this.book.set(await this.bookService.getById(id));
    } catch {
      this.error.set('ไม่พบหนังสือเล่มนี้');
    } finally {
      this.loading.set(false);
    }
  }
}
💡
ActivatedRoute= ตัวที่บอกว่า "ตอนนี้ผู้ใช้อยู่ที่ URL ไหน และมีค่าอะไรอยู่ใน URL บ้าง"paramMap.get('id')= หยิบเลขจาก URL เช่น/books/3จะได้"3"💡
Number(...)= แปลงข้อความเป็นตัวเลข เพราะทุกอย่างที่มาจาก URL เป็นข้อความเสมอ💡
Book | null= เก็บได้ทั้งหนังสือหรือค่าว่าง ตอนแรกยังไม่มีข้อมูลจึงเป็นnullเครื่องหมาย|แปลว่า "อย่างใดอย่างหนึ่ง"
1.3 หน้าตา
แทนที่ book-detail.html
<div class="p-6 max-w-3xl mx-auto">
  <a routerLink="/" class="text-blue-600 hover:underline">← กลับหน้ารายการ</a>

  @if (loading()) {
    <p class="mt-4 text-gray-500">กำลังโหลด...</p>
  } @else if (error()) {
    <p class="mt-4 text-red-600">{{ error() }}</p>
  } @else if (book(); as b) {
    <div class="mt-4 border rounded-lg p-6">
      <h1 class="text-2xl font-bold">{{ b.title }}</h1>
      <p class="text-gray-600 mt-1">{{ b.author }}</p>
      <p class="mt-2">ปีที่พิมพ์: {{ b.year }}</p>
      <p class="mt-1">หมวดหมู่: {{ b.category?.name }}</p>

      <div class="mt-6 flex gap-2">
        <a [routerLink]="['/books', b.id, 'edit']"
           class="px-4 py-2 bg-amber-500 text-white rounded">แก้ไข</a>
      </div>
    </div>
  }
</div>
💡
@if (book(); as b)= ถ้ามีค่า ให้ตั้งชื่อย่อว่าbแล้วใช้ในบล็อกนี้ได้เลย ไม่ต้องเขียนbook()!.titleทุกครั้ง 💡routerLink= ลิงก์ที่เปลี่ยนหน้าโดยไม่โหลดเว็บใหม่ทั้งหน้า ต่างจากhrefธรรมดา 💡[routerLink]="['/books', b.id, 'edit']"= ประกอบ URL จากหลายส่วน ได้ผลเป็น/books/3/edit
1.4 เพิ่มเส้นทาง
แก้ app.routes.ts
import { Routes } from '@angular/router';
import { BookList } from './books/book-list/book-list';
import { BookDetail } from './books/book-detail/book-detail';

export const routes: Routes = [
  { path: '', component: BookList },
  { path: 'books/:id', component: BookDetail },
];
💡
:idคือช่องว่าง ที่รับค่าอะไรก็ได้/books/1และ/books/99เข้าหน้าเดียวกัน แต่ได้ค่า id ต่างกัน 💡 Router = ป้ายบอกทาง ว่า URL ไหนพาไปหน้าไหน
1.5 ทำให้การ์ดกดได้
แก้ book-card.ts เพิ่ม RouterLink
import { Component, input } from '@angular/core';
import { RouterLink } from '@angular/router';
import { Book } from '../book';

@Component({
  selector: 'app-book-card',
  imports: [RouterLink],
  templateUrl: './book-card.html',
  styleUrl: './book-card.css',
})
export class BookCard {
  book = input.required<Book>();
}
ครอบ <div> ทั้งก้อนใน book-card.html ด้วย
<a [routerLink]="['/books', book().id]" class="block">
  <div class="border rounded-lg p-4 hover:shadow-md transition">
    <!-- เนื้อหาเดิมทั้งหมด -->
  </div>
</a>
✅ คลิกการ์ดต้องไปหน้ารายละเอียด และกด "กลับหน้ารายการ" ต้องกลับมาได้
ช่วงที่ 2 — เพิ่ม endpoint ฝั่ง API (25 นาที)
🗺️ ตำแหน่งตอนนี้ในระบบ
- ✅ เตรียมเครื่องมือ (ทำไปแล้ว)
- ✅ Angular (หน้าบ้าน) (ทำไปแล้ว)
- 🟢 NestJS (หลังบ้าน) ← กำลังทำช่วงนี้
- 🟢 PostgreSQL (ฐานข้อมูล) ← กำลังทำช่วงนี้
ต่อไป: สร้างฟอร์มฝั่งหน้าบ้านให้เรียกใช้ endpoint ที่เพิ่งทำ
2.1 ติดตั้งตัวช่วยตรวจข้อมูล
cd C:\webdev\booklab
npm install class-validator class-transformer --workspace api
⚠️ ห้ามข้ามขั้นตอนนี้ ตอนสร้างโปรเจกต์ NestJS ในคาบ 1 สอง package นี้ไม่ได้ติดมาด้วย ถ้าข้ามขั้นตอนนี้แล้วเขียน DTO ในข้อถัดไปเลย จะเจอ error สีแดงทันที
Cannot find module 'class-validator' or its corresponding type declarations.💡
class-validator= ที่มาของ decorator อย่าง@IsString(),@IsInt()ที่จะใช้ในขั้นต่อไป 💡class-transformer= ตัวช่วยแปลงข้อมูลดิบจาก HTTP request ให้กลายเป็น instance ของ class DTO ก่อนตรวจ ทำงานคู่กันเสมอ
2.2 สร้างแบบฟอร์มข้อมูลขาเข้า
สร้างไฟล์ apps/api/src/books/dto/create-book.dto.ts
import { IsInt, IsNotEmpty, IsString, Max, Min } from 'class-validator';

export class CreateBookDto {
  @IsString()
  @IsNotEmpty({ message: 'กรุณากรอกชื่อหนังสือ' })
  title: string;

  @IsString()
  @IsNotEmpty({ message: 'กรุณากรอกชื่อผู้แต่ง' })
  author: string;

  @IsInt({ message: 'ปีต้องเป็นตัวเลข' })
  @Min(1000)
  @Max(2100)
  year: number;

  @IsInt()
  categoryId: number;
}
💡 DTO คืออะไร และต่างจาก interface อย่างไร DTO = แบบฟอร์มสำหรับข้อมูล ขาเข้า ที่ผู้ใช้กรอกส่งมา
ต่างจาก
interfaceตรงที่ interface เป็นแค่กติกาที่ TypeScript ใช้ตอนพิมพ์โค้ด พอโปรแกรมรันจริงมันหายไปเลย แต่ข้อมูลที่ผู้ใช้ส่งมาเชื่อไม่ได้ ต้องตรวจตอนรันจริงด้วยDTO เป็นคลาสจริงที่มีป้าย
@IsString()ติดอยู่ จึงตรวจตอนรันได้💡
@IsNotEmpty({ message: '...' })= ห้ามว่าง พร้อมข้อความที่จะตอบกลับเป็นภาษาไทย
2.3 เปิดใช้ตัวตรวจ
แก้ apps/api/src/main.ts
import { NestFactory } from '@nestjs/core';
import { ValidationPipe } from '@nestjs/common';
import { AppModule } from './app.module';

async function bootstrap() {
  const app = await NestFactory.create(AppModule);
  app.enableCors();
  app.setGlobalPrefix('api');
  app.useGlobalPipes(
    new ValidationPipe({ whitelist: true, transform: true }),
  );
  await app.listen(process.env.PORT ?? 3000);
}
bootstrap();
⚠️ อย่าลืม
app.enableCors()จากคาบที่ 1 — ไฟล์นี้ถูกแทนที่ทั้งไฟล์ ถ้าลืมบรรทัดนี้ หน้าบ้าน Angular (port 4200) จะยิง API ไม่ได้อีกเลยตั้งแต่ขั้นนี้เป็นต้นไป โดยขึ้น error เกี่ยวกับ CORS ใน Console ไม่ใช่ error ที่ชัดเจนว่าเกิดจากตรงนี้💡
ValidationPipe= ยามหน้าประตู ตรวจข้อมูลขาเข้าทุกชิ้นตาม DTO ถ้าไม่ผ่านจะตีกลับเป็น error ทันที ไม่ปล่อยของเสียเข้าฐานข้อมูล
whitelist: true= ตัดช่องที่ไม่ได้ประกาศใน DTO ทิ้ง กันคนแอบยัดข้อมูลแปลก ๆ เข้ามาtransform: true= แปลงชนิดข้อมูลให้อัตโนมัติ
2.4 เพิ่มคำสั่งใน service
เพิ่มสามเมธอดใน apps/api/src/books/books.service.ts
  create(data: CreateBookDto) {
    return this.prisma.book.create({ data });
  }

  update(id: number, data: CreateBookDto) {
    return this.prisma.book.update({ where: { id }, data });
  }

  remove(id: number) {
    return this.prisma.book.delete({ where: { id } });
  }
อย่าลืมเพิ่ม import ด้านบนไฟล์
import { CreateBookDto } from './dto/create-book.dto';2.5 เพิ่ม endpoint ใน controller
แทนที่ apps/api/src/books/books.controller.ts
import {
  Controller, Get, Post, Put, Delete,
  Body, Param, Query, ParseIntPipe,
} from '@nestjs/common';
import { BooksService } from './books.service';
import { CreateBookDto } from './dto/create-book.dto';

@Controller('books')
export class BooksController {
  constructor(private booksService: BooksService) {}

  @Get()
  findAll(@Query('q') q?: string) {
    return this.booksService.findAll(q);
  }

  @Post()
  create(@Body() dto: CreateBookDto) {
    return this.booksService.create(dto);
  }

  @Get(':id')
  findOne(@Param('id', ParseIntPipe) id: number) {
    return this.booksService.findOne(id);
  }

  @Put(':id')
  update(@Param('id', ParseIntPipe) id: number, @Body() dto: CreateBookDto) {
    return this.booksService.update(id, dto);
  }

  @Delete(':id')
  remove(@Param('id', ParseIntPipe) id: number) {
    return this.booksService.remove(id);
  }
}
💡 ครบทั้งสี่คำกริยาแล้ว
ป้าย ความหมาย ตัวอย่าง @Get()ขอดู ดูรายการ @Post()เพิ่มใหม่ เพิ่มหนังสือ @Put()แก้ไขของเดิม แก้ชื่อหนังสือ @Delete()ลบ ลบหนังสือ รวมเรียกว่า CRUD (Create, Read, Update, Delete) เป็นพื้นฐานของแทบทุกระบบในโลก
💡
@Body()= รับข้อมูลที่ส่งมาในตัวคำขอ ไม่ใช่ใน URL เพราะข้อมูลยาวและอาจมีความลับ⚠️
@Get(':id')ต้องอยู่ล่างกว่า@Post()เพราะ:idรับได้ทุกอย่าง ถ้าอยู่บนจะกิน endpoint อื่นหมด
ช่วงที่ 3 — ฟอร์มเพิ่มหนังสือ (35 นาที)
🗺️ ตำแหน่งตอนนี้ในระบบ
- ✅ เตรียมเครื่องมือ (ทำไปแล้ว)
- 🟢 Angular (หน้าบ้าน) ← กำลังทำช่วงนี้
- 🟢 NestJS (หลังบ้าน) ← กำลังทำช่วงนี้
- 🟢 PostgreSQL (ฐานข้อมูล) ← กำลังทำช่วงนี้
ต่อไป: เพิ่มปุ่มลบให้ระบบ CRUD ครบวงจร
3.1 เพิ่มคำสั่งใน service ฝั่ง Angular
เพิ่มใน apps/web/src/app/books/book.service.ts
  create(data: Partial<Book>): Promise<Book> {
    return firstValueFrom(this.http.post<Book>(this.apiUrl, data));
  }

  update(id: number, data: Partial<Book>): Promise<Book> {
    return firstValueFrom(this.http.put<Book>(`${this.apiUrl}/${id}`, data));
  }

  remove(id: number): Promise<void> {
    return firstValueFrom(this.http.delete<void>(`${this.apiUrl}/${id}`));
  }
💡
Partial<Book>= หนังสือที่ไม่ต้องกรอกครบทุกช่อง เพราะตอนสร้างใหม่เรายังไม่มีid(ฐานข้อมูลจะแจกให้เอง)
3.2 สร้างหน้าฟอร์ม
npm exec -- ng generate component books/book-form --skip-testsแทนที่ book-form.ts
import { Component, signal, inject, OnInit } from '@angular/core';
import { FormBuilder, ReactiveFormsModule, Validators } from '@angular/forms';
import { ActivatedRoute, Router } from '@angular/router';
import { BookService } from '../book.service';

@Component({
  selector: 'app-book-form',
  imports: [ReactiveFormsModule],
  templateUrl: './book-form.html',
  styleUrl: './book-form.css',
})
export class BookForm implements OnInit {
  private fb = inject(FormBuilder);
  private bookService = inject(BookService);
  private route = inject(ActivatedRoute);
  private router = inject(Router);

  editingId = signal<number | null>(null);
  saving = signal(false);
  error = signal('');

  form = this.fb.group({
    title: ['', Validators.required],
    author: ['', Validators.required],
    year: [2024, [Validators.required, Validators.min(1000)]],
    categoryId: [1, Validators.required],
  });

  async ngOnInit() {
    const idParam = this.route.snapshot.paramMap.get('id');
    if (idParam) {
      const id = Number(idParam);
      this.editingId.set(id);
      const book = await this.bookService.getById(id);
      this.form.patchValue({
        title: book.title,
        author: book.author,
        year: book.year,
        categoryId: book.category?.id ?? 1,
      });
    }
  }

  async save() {
    if (this.form.invalid) {
      this.form.markAllAsTouched();
      return;
    }
    this.saving.set(true);
    this.error.set('');
    try {
      const value = this.form.getRawValue() as any;
      if (this.editingId()) {
        await this.bookService.update(this.editingId()!, value);
      } else {
        await this.bookService.create(value);
      }
      this.router.navigate(['/']);
    } catch {
      this.error.set('บันทึกไม่สำเร็จ');
    } finally {
      this.saving.set(false);
    }
  }
}
💡 Reactive Forms คืออะไร คือวิธีทำฟอร์มที่ประกาศโครงสร้างไว้ในโค้ด ว่ามีช่องอะไร กฎเป็นยังไง แทนที่จะไปไล่เก็บค่าจากหน้าจอทีละช่องเอง
this.fb.group({...})= สร้างฟอร์มที่มี 4 ช่อง แต่ละช่องระบุ[ค่าเริ่มต้น, กฎ]💡
Validators.required= กฎว่าห้ามว่าง — นี่คือการตรวจฝั่งหน้าบ้าน มีไว้ให้ผู้ใช้รู้ตัวเร็ว แต่ยังต้องตรวจฝั่ง API ด้วยเสมอ เพราะคนที่ตั้งใจโกงข้ามหน้าเว็บไปยิง API ตรง ๆ ได้💡 หน้าเดียวใช้ได้สองงาน — ถ้า URL มี
idแปลว่ากำลังแก้ไข ก็โหลดข้อมูลเดิมมาใส่ ถ้าไม่มีก็คือเพิ่มใหม่💡
this.router.navigate(['/'])= สั่งเปลี่ยนหน้าจากในโค้ด ใช้หลังบันทึกเสร็จ
3.3 หน้าตาฟอร์ม
แทนที่ book-form.html
<div class="p-6 max-w-lg mx-auto">
  <h1 class="text-2xl font-bold mb-4">
    {{ editingId() ? 'แก้ไขหนังสือ' : 'เพิ่มหนังสือ' }}
  </h1>

  <div class="grid gap-3">
    <div>
      <label class="block text-sm mb-1">ชื่อหนังสือ</label>
      <input [formControl]="form.controls.title" class="border rounded px-3 py-2 w-full" />
      @if (form.controls.title.touched && form.controls.title.invalid) {
        <p class="text-red-600 text-sm mt-1">กรุณากรอกชื่อหนังสือ</p>
      }
    </div>

    <div>
      <label class="block text-sm mb-1">ผู้แต่ง</label>
      <input [formControl]="form.controls.author" class="border rounded px-3 py-2 w-full" />
      @if (form.controls.author.touched && form.controls.author.invalid) {
        <p class="text-red-600 text-sm mt-1">กรุณากรอกชื่อผู้แต่ง</p>
      }
    </div>

    <div>
      <label class="block text-sm mb-1">ปีที่พิมพ์</label>
      <input type="number" [formControl]="form.controls.year" class="border rounded px-3 py-2 w-full" />
    </div>

    <div>
      <label class="block text-sm mb-1">หมวดหมู่ (1=Programming, 2=Design)</label>
      <input type="number" [formControl]="form.controls.categoryId" class="border rounded px-3 py-2 w-full" />
    </div>

    @if (error()) {
      <p class="text-red-600">{{ error() }}</p>
    }

    <div class="flex gap-2 mt-2">
      <button (click)="save()" [disabled]="saving()"
        class="px-4 py-2 bg-blue-600 text-white rounded disabled:opacity-50">
        {{ saving() ? 'กำลังบันทึก...' : 'บันทึก' }}
      </button>
      <a routerLink="/" class="px-4 py-2 border rounded">ยกเลิก</a>
    </div>
  </div>
</div>
⚠️ ต้องเพิ่ม
RouterLinkในimportsของbook-form.tsด้วย เพราะใช้routerLinkในปุ่มยกเลิก💡
touched= ผู้ใช้เคยคลิกเข้าไปในช่องนี้แล้ว ใช้คู่กับinvalidเพื่อไม่ให้ขึ้นข้อความแดงตั้งแต่ยังไม่ทันกรอก 💡[disabled]="saving()"= ปิดปุ่มระหว่างกำลังบันทึก กันกดซ้ำ
3.4 เพิ่มเส้นทาง
export const routes: Routes = [
  { path: '', component: BookList },
  { path: 'books/new', component: BookForm },
  { path: 'books/:id', component: BookDetail },
  { path: 'books/:id/edit', component: BookForm },
];
⚠️
books/newต้องอยู่บนbooks/:idไม่งั้นคำว่าnewจะถูกมองเป็น id
เพิ่มปุ่มในหน้ารายการ (book-list.html บนสุด) และเพิ่ม RouterLink ใน imports ของ book-list.ts
<a routerLink="/books/new" class="inline-block mb-4 px-4 py-2 bg-green-600 text-white rounded">
  + เพิ่มหนังสือ
</a>
ช่วงที่ 4 — ปุ่มลบ (25 นาที)
🗺️ ตำแหน่งตอนนี้ในระบบ
- ✅ เตรียมเครื่องมือ (ทำไปแล้ว)
- 🟢 Angular (หน้าบ้าน) ← กำลังทำช่วงนี้
- 🟢 NestJS (หลังบ้าน) ← กำลังทำช่วงนี้
- 🟢 PostgreSQL (ฐานข้อมูล) ← กำลังทำช่วงนี้
ต่อไป: คาบหน้า: ตรวจความปลอดภัยแล้วนำขึ้นใช้งานจริง
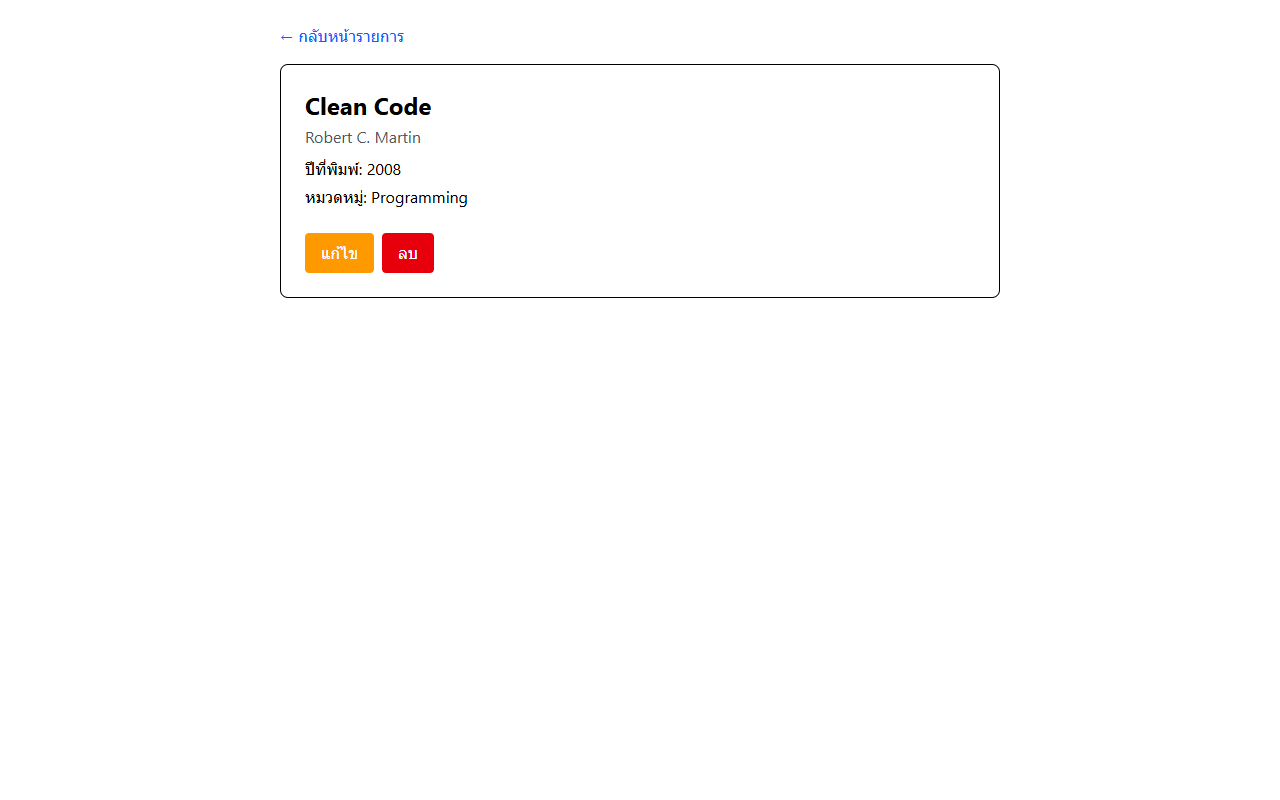
4.1 เพิ่มปุ่มลบในหน้ารายละเอียด
เพิ่มใน book-detail.ts
  private router = inject(Router);
  deleting = signal(false);

  async onDelete(id: number) {
    if (!confirm('ยืนยันการลบหนังสือเล่มนี้?')) return;
    this.deleting.set(true);
    try {
      await this.bookService.remove(id);
      this.router.navigate(['/']);
    } catch {
      this.error.set('ลบไม่สำเร็จ');
    } finally {
      this.deleting.set(false);
    }
  }
เพิ่ม import Router ด้านบน
import { ActivatedRoute, Router, RouterLink } from '@angular/router';เพิ่มปุ่มใน book-detail.html ต่อจากปุ่มแก้ไข
<button (click)="onDelete(b.id)" [disabled]="deleting()"
  class="px-4 py-2 bg-red-600 text-white rounded disabled:opacity-50">
  {{ deleting() ? 'กำลังลบ...' : 'ลบ' }}
</button>
💡
confirm(...)= กล่องถามยืนยันของเบราว์เซอร์ คืนค่าจริง/เท็จ การลบต้องถามยืนยันเสมอ เพราะกู้คืนไม่ได้ — เป็นมารยาทพื้นฐานของการออกแบบ
4.2 ทดสอบให้ครบวงจร
| ทดสอบ | ผลที่ควรได้ |
|---|---|
| กด "เพิ่มหนังสือ" กรอกครบ แล้วบันทึก | กลับหน้ารายการ เห็นเล่มใหม่ |
| กดบันทึกโดยไม่กรอกชื่อ | ขึ้นข้อความแดง ไม่ส่งไป API |
| คลิกการ์ด → แก้ไข → เปลี่ยนชื่อ → บันทึก | ชื่อเปลี่ยนในรายการ |
| เข้าหน้ารายละเอียด → ลบ → ยืนยัน | กลับหน้ารายการ เล่มนั้นหายไป |
| เปิด Prisma Studio | ข้อมูลตรงกับที่เห็นบนหน้าเว็บ |
🚀 ถ้าเสร็จก่อนเพื่อน
- เปลี่ยนช่องหมวดหมู่จากกรอกเลข เป็น dropdown ที่ดึงรายชื่อจาก API
- เพิ่มปุ่มลบในหน้ารายการเลย ไม่ต้องเข้าหน้ารายละเอียด
- หลังบันทึกสำเร็จ ให้ขึ้นข้อความยืนยันสัก 2 วินาที
❓ ปัญหาที่พบบ่อย
| อาการ | สาเหตุ | วิธีแก้ |
|---|---|---|
400 Bad Request ตอนบันทึก |
ข้อมูลไม่ผ่าน DTO | ดู Network → Response จะบอกว่าช่องไหนผิด |
year ส่งไปเป็นข้อความ |
ลืม type="number" |
เพิ่มใน <input> |
P2003 Foreign key constraint |
categoryId ไม่มีอยู่จริง |
ใส่ 1 หรือ 2 เท่านั้น |
กด /books/new แล้วไปหน้ารายละเอียด |
ลำดับ route ผิด | ย้าย books/new ขึ้นบน books/:id |
formControl ใช้ไม่ได้ |
ลืม ReactiveFormsModule |
เพิ่มใน imports: [] |
| แก้ไขแล้วช่องว่างเปล่า | patchValue ไม่ทำงาน |
ตรวจว่า await getById สำเร็จไหม |
คาบหน้า ตรวจสอบความปลอดภัย นำขึ้นใช้งานจริง และทบทวนภาพรวมทั้งหลักสูตร